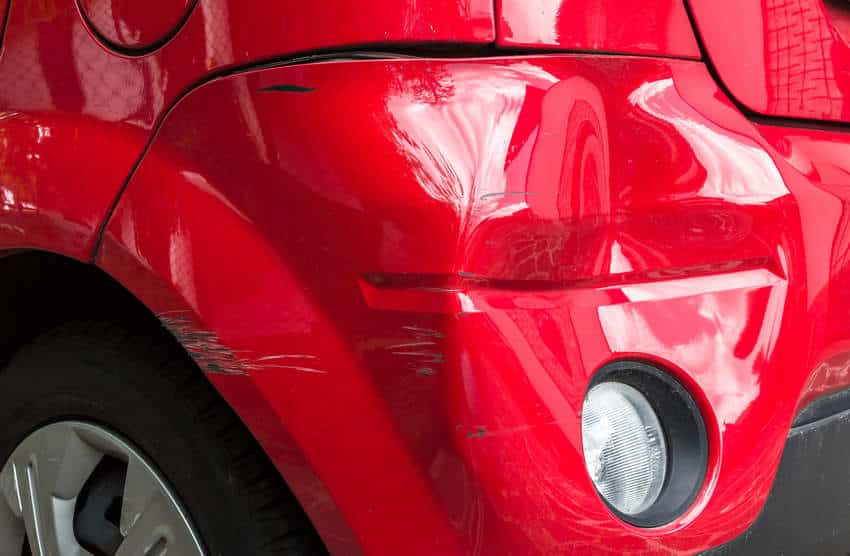
There are some things that are just unavoidable if you’re a car owner – and denting or cracking your bumper is one of them! We’ve all been there – maybe you reversed into a pole or fire hydrant, or maybe someone else drove into the back of you? When this happens, it’s a good idea to know how to repair the bumper yourself so you can save money and avoid needing to bring your car to the shop! Today, we’ll be explaining how you can repair a dented or cracked bumper.
Repairing a dented bumper
You’re going to need:
- A heat gun or hair dryer
- Jack
- Jack stand
- Long pry bar or crowbar
- Safety goggles
- Work gloves
- Start by raising your car and supporting it with the jack stand.
- If you have a splash guard on your bumper, remove this so you have clear access to the bumper.
- Use the heat gun or hair dryer to heat the affected area until it is soft enough to mold – be aware that you’re dealing with very high temperatures here! This is usually about 5 minutes on the highest heat using a hairdryer.
- Use the prybar or crowbar to push out the affected area from the inside out. This could be a two-person job – one person to heat the bumper while the other pushes it out from the inside.
- To ensure that the bumper pops out evenly, continuously apply pressure to the deepest areas – this will mean that it has a nice even finish once it’s popped back into place!
Repairing a cracked bumper
You’re going to need:
- ½-inch burrowing tool
- Angle grinder
- Body filler
- Drill that fits the burrowing tool
- Dust mask
- Heavy duty gloves
- Jack
- Jack stand
- Masking paper/newspaper
- Paintbrush
- Paint cleaner or 3M wax and grease remover
- Fiberglass bumper repair kit
- Putty knife/spreader
- Sandpaper
- Moderate strength tape
- Put on your dust mask and gloves – don’t take them off until you’re finished!
- Raise your vehicle on the jack and put it into place using the jack stands.
- Clean away any dirt or grease that is around the areas that you’ll be working on.
- If there are any parts of the bumper hanging off – plastic or fiberglass, then use the angle grinder and burrowing tool/drill bit to cut these away. Try as best you can to cut straight, clean edges.
- Sand down the damaged area with sandpaper – make sure you sand around the whole area, about 3 or 4 inches wide of the affected area.
- Remove any dust with a wet rag.
- Clean the whole area with paint prep or the 3M wax and grease remover.
- From the bumper repair kit, cut 4 to 6 pieces of the fiberglass sheet – this should be about 1 to 2 inches larger than the affected area.
- Mix together the catalyst and resin from the repair kit – ensure you use protective gloves!
- Use a paintbrush to apply the resin to the area being repaired.
- Apply several layers of the fiberglass sheets. You’ll need to ensure you’re applying enough resin in between the layers for it to stick properly.
- Brush the front area with the resin and let it dry for 30 minutes.
- Once dry, sand down this area. Make sure that you get the surface as smooth as possible and flush with the rest of the bumper.
- Use the paint prep or 3M wax remover to clean the area.
- Apply multiple layers of body filler using the putty knife. You should build the surface up using about 4 wipes. Mold the layers into the contours of the bumper.
- Sand down the surfaces using sandpaper. Again, try to get the shape as flush with the original bumper as you can.
- Clean the area using paint prep and 3M wax remover.
- Using the paper and masking tape, cover the areas of the bumper that you don’t want to get a primer on – this should be done with utmost care!
- Apply around 5 layers of primer, but ensure you read the manufacturer’s guidelines first!
Now, your bumper is ready for a paint job!
There are some repairs you can make to your vehicle that are easy, quick, and turn out surprisingly professional! If you need to repair your bumper, why not try giving it a go yourself?! If you’d rather have a professional do it, give us a call at JD’s Auto Repair, we’re always willing to give your car that professional finish no matter the damage!